
30 Small Kitchen Hacks for Homes Without a Pantry

The Problem
Many kitchens have awkward dead zones — the gap between the end of the counter and the wall, the space beside the refrigerator, the narrow area between an appliance and a cabinet end. These spaces are too narrow for furniture but too wasteful to leave empty.
Why It Works
A slim rolling cart parked in one of these dead zones essentially converts unused geometry into a functional pantry. Since it’s on wheels, it rolls out when you need access and tucks back in when you don’t. No renovation required, no permanent change, no tools needed.
How to Do It
Walk through your kitchen and identify every gap wider than 8 inches. Common dead zones: beside the refrigerator (often 4–12 inches), between the end cabinet and a wall, between the stove and a counter end, and in any recessed alcove or nook. Measure each gap carefully — width, depth, and height — then find a cart that fits with a half-inch of clearance on each side for easy rolling.
For very narrow gaps (under 8 inches), look for pull-out pantry inserts specifically designed for tight spaces. These are narrower than standard carts but can hold surprising amounts of canned goods and dry foods when organized with slim bins.
Extra Tips
If the dead zone isn’t adjacent to your kitchen prep area, you can still use it for less-accessed items — backup stock, bulk purchases, seasonal baking supplies. Frequency of access should drive cart placement.
What to Avoid
Avoid parking a cart in a dead zone that blocks a cabinet, a drawer, or a door from opening fully. Check clearances not just when the cart is parked, but also when it’s pulled partway out.
Page 5 Quick Checklist
- Measure every gap wider than 8 inches in your kitchen
- Decide what function the cart will serve before buying it
- Measure cart shelf dimensions before buying bins to go on it
- Choose a cart with locking wheels and open shelving
Up Next: Fix Countertop Clutter
Your counter is the most valuable real estate in a small kitchen — and it’s probably doing work it shouldn’t be. Next: a simple system for keeping counters mostly clear, all the time. ← PreviousNext: Clear the Counter →
11.Fix Countertop Clutter
In a small kitchen, the counter does double duty as prep space, landing zone, and storage overflow. The result is usually cluttered and stressful. These three ideas help you reclaim counter space and keep it clear — without relocating everything to a drawer you’ll never open.
10.Keep Only 3–5 Items on the Counter
The Problem
Kitchen counter clutter happens gradually. One appliance gets left out because it’s convenient. Then a cutting board. Then the coffee maker. Then a fruit bowl. Then spices. Before long, the counter has 15 items on it and there’s barely room to prep a meal. This is the single biggest complaint of tiny kitchen organization — and it’s almost entirely self-inflicted.
Why It Works
A strict 3–5 item rule forces you to consciously choose what earns permanent counter space. Everything that stays must be used at least daily, too heavy or large to store conveniently elsewhere, or both. Everything else gets a home inside a cabinet or on a shelf. Suddenly, the counter feels twice as big — because it effectively is.
How to Do It
© 2025 AI Illustrator — Inspiration Only
Stand at your counter and make an honest inventory of everything currently on it. For each item, ask: do I use this every single day? Would it be genuinely difficult to store it elsewhere? If the answer to both questions isn’t yes, the item moves. Common items that almost always belong in a cabinet: toaster (use it less than daily? it stores), stand mixer (gorgeous but large), extra cutting boards, decorative items, rarely used appliances.
The 3–5 items that earn counter space should be things like the coffee maker (if used daily), a single knife block or magnetic strip, a fruit bowl (if it genuinely sees daily use), and one small container of daily-use cooking items.
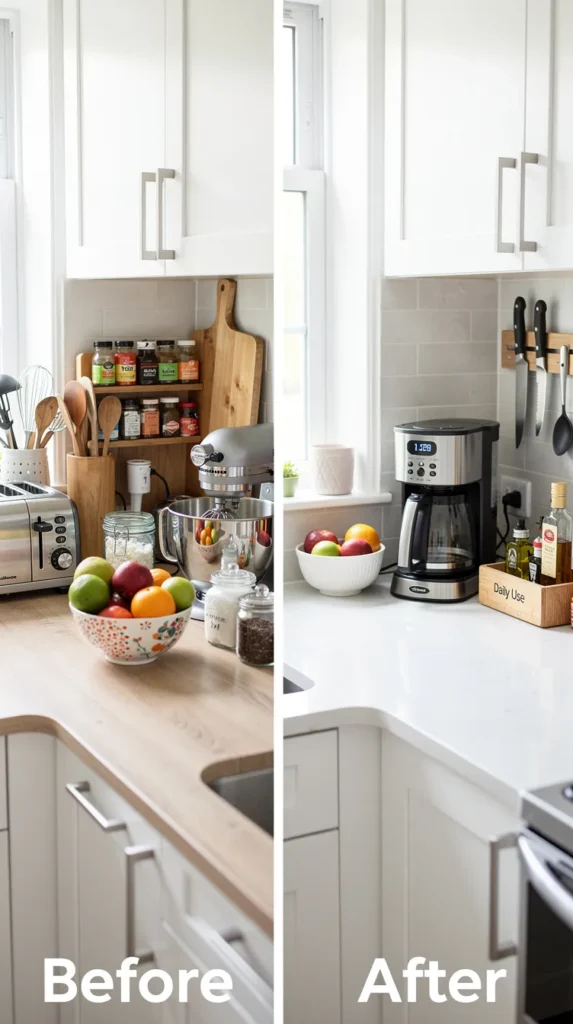
Extra Tips
Take a before-and-after photo of your counter. The visual comparison is often the most motivating thing you can do — and it helps you maintain the standard over time.
What to Avoid
Don’t create a “temporary” landing zone on one corner of the counter. This is where clutter re-accumulates fastest. If a corner of the counter is empty, it stays empty — it’s prep space, not storage.
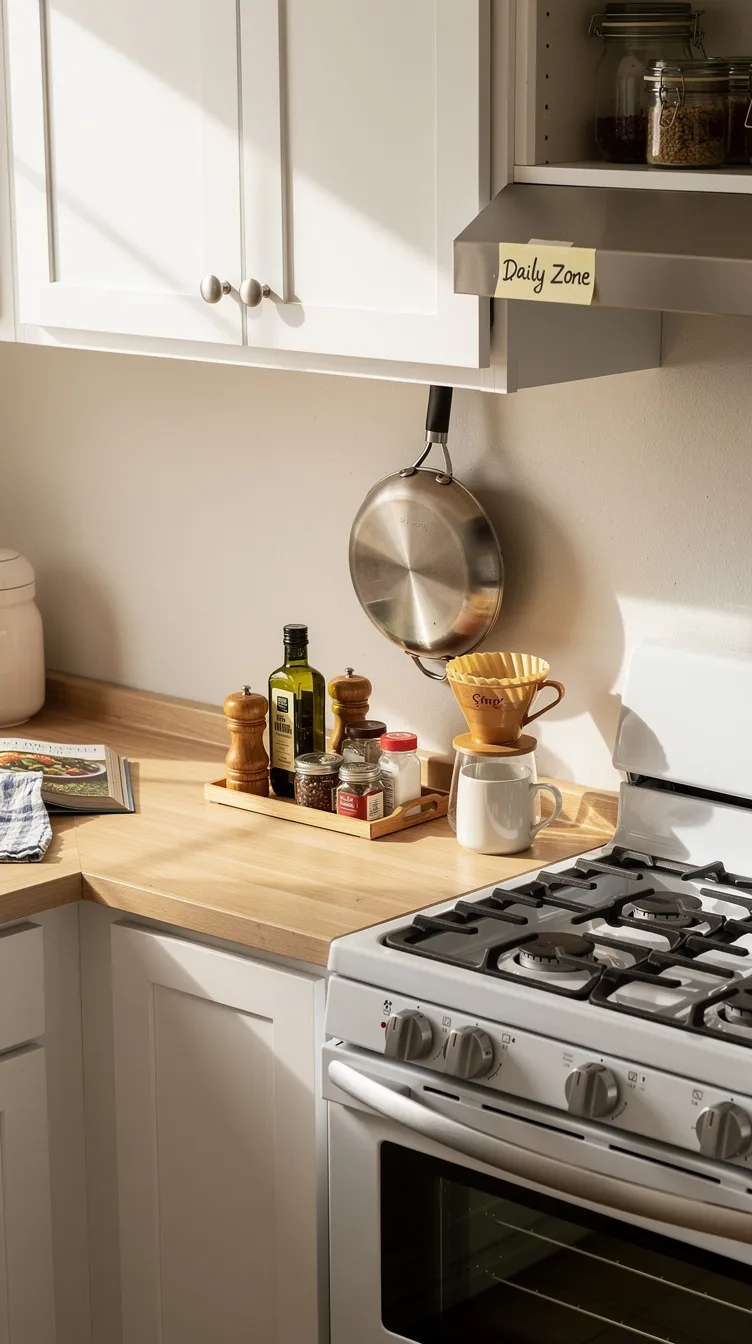
9.Use a Tray for Oils and Seasonings
The Problem
Cooking oils, vinegars, and daily-use seasonings often get left on the counter because they’re needed constantly during cooking. But five or six loose bottles create visual noise and gradually migrate across the counter surface.
Why It Works
A small tray or riser corrals these bottles into one defined footprint. Instead of seven individual items occupying scattered counter space, you have one object — the tray — that contains all of them. Psychologically, contained clutter reads as “organized” even when the number of items hasn’t changed. More practically, cleaning the counter means moving one tray rather than seven bottles.
How to Do It
Choose a tray that’s appropriately sized for your 3–5 most-used oils and seasonings. Small wooden boards, ceramic trays, or even a shallow basket work well. The tray should comfortably hold each bottle without forcing them, so when you grab one, the others don’t fall over. Place the tray near the stove — where these items are most used — in a spot that doesn’t block prep space.
If you use more than 5 oils and seasonings regularly, move the extras to a wall rail or a door-mounted spice rack (see page 3) and keep only the daily essentials on the counter tray.
Extra Tips
A tiered tray or a small lazy Susan works even better than a flat tray because you can see and reach items in the back without moving the front ones. A lazy Susan is especially good if your tray needs to sit in a corner.
What to Avoid
Don’t let the tray become a dumping ground for non-cooking items. The moment a rubber band, a pen, or an unopened mail envelope lands on the tray, it starts to lose its organizing function. Keep it strictly cooking items only.
One Comment
Comments are closed.