
30 Small Kitchen Hacks for Homes Without a Pantry

The Problem
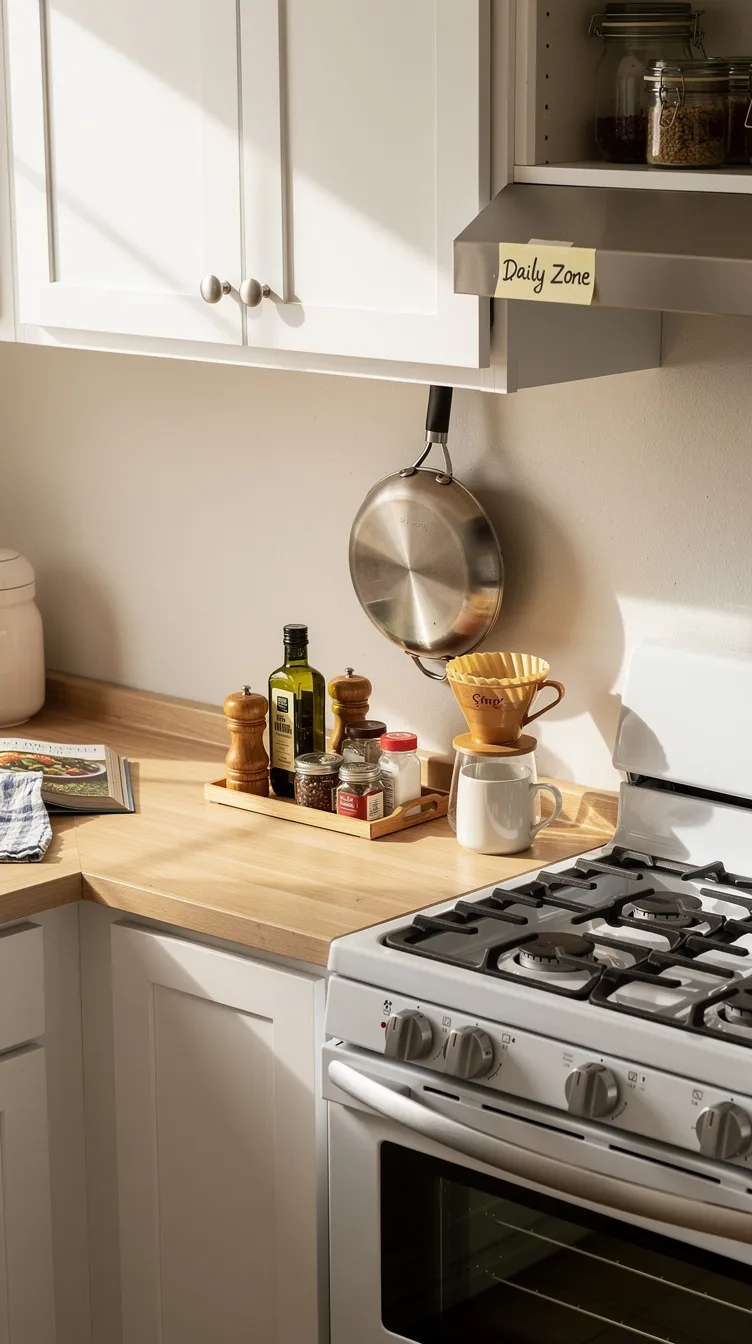
Appliances are the biggest culprits of counter clutter in small kitchens. A stand mixer, a juicer, a waffle iron, a food processor — each one is individually reasonable to own, but together they consume more counter space than the kitchen has. And many of them get used less than once a month.
Why It Works
Storing appliances off the counter and retrieving them only when needed is a shift in habit, not a sacrifice of convenience. The appliance is just as available — it just lives in a cabinet, in a closet, or on an appliance shelf (more on that in page 9) rather than on the counter. The payoff is counter space that’s actually usable for cooking, every day.
How to Do It
Audit every appliance currently on your counter. For each one, note honestly how many times per week you use it. Daily users earn counter space. Weekly users should be stored and retrieved weekly — the extra 60 seconds is worth having a functional prep surface. Monthly users should live in a dedicated appliance cabinet. Seasonal users (waffle irons, holiday baking equipment) can move out of the kitchen entirely between seasons.
For appliances you want to keep accessible without leaving on the counter, page 9 covers appliance shelves and vertical divider storage in detail.
Extra Tips
Get in the habit of putting appliances away immediately after use rather than “just leaving it out for now.” The moment an appliance sits out overnight, it becomes a permanent counter resident. Immediate return is the habit that makes everything else work.
What to Avoid
Don’t store appliances in inconvenient locations — if retrieving the blender requires moving six things in a cabinet, it’ll never get used and you’ll justify leaving it on the counter instead. The storage location needs to be easy or the system fails.
Page 6 Quick Checklist
- Do a counter audit — list every item currently on it
- Challenge each item: is it used daily? Is it genuinely hard to store?
- Buy a tray or lazy Susan to consolidate oils and seasonings
- Find a home inside a cabinet for any appliance used less than weekly
Up Next: Hidden Kitchen Corners
Corner shelves, the space above your cabinets, and under-shelf gaps are all underused. Next page reveals how to use these awkward spaces without making your kitchen feel cramped. ← PreviousNext: Hidden Kitchen Corners →
7.Use Hidden Kitchen Corners
Every kitchen has overlooked storage zones: the awkward corner shelf, the space above the cabinets, the gap under the cabinet shelves themselves. Used thoughtfully, these can add meaningful storage without changing the look or feel of your kitchen much at all.
6.Use Corner Shelves Carefully
The Problem
Kitchen corners — whether inside cabinets (the dreaded “dead corner”) or in open room corners — are notoriously hard to use well. Cabinet corner spaces are difficult to reach and tend to trap items. Corner walls are often just blank and wasted.
Why It Works
For open corner walls (like the space beside a window or in a breakfast nook), a corner shelf unit actually uses the geometry of the room rather than fighting it. L-shaped or triangular corner shelves fit snugly into wall corners and create storage that wouldn’t exist with a standard straight shelf. For cabinet corners, a Lazy Susan or a D-shaped pull-out tray makes the difficult-to-reach area fully functional.
How to Do It
For open wall corners, look for a tiered corner shelf or build one with adjustable brackets angled into the corner. These work well for rarely-used items, cookbooks, or displayed dry goods in jars. For cabinet corners, a bi-fold pull-out organizer (often called a “blind corner organizer”) extends from the corner when the door is open, bringing hidden items to you rather than forcing you to reach in.
Extra Tips
Use cabinet corners for less-frequently needed items — baking equipment, entertaining supplies, bulk backup stock. Reserve your easily accessible shelves for daily-use items.
What to Avoid
Don’t turn a corner cabinet into a junk zone just because it’s hard to reach. If you can’t see it or access it easily, things will expire and get forgotten. Either use a proper corner organizer to make it functional, or use it only for items you know you’ll use every few months on a predictable schedule.
5.Use the Space Above Cabinets
The Problem
In kitchens where the upper cabinets don’t reach all the way to the ceiling, there’s a horizontal ledge above the cabinets that’s typically unused — or, worse, used as a permanent home for things that never get touched. This space can actually be quite substantial.
Why It Works
The space above cabinets is ideal for infrequently used but bulky items: large serving platters, holiday baking tins, a stock pot you use twice a year, extra paper towel rolls, or even lightweight wicker baskets that hold seasonal items. Because it’s out of the normal sightline, it doesn’t create visual clutter during day-to-day cooking.
How to Do It
Measure the height of the gap above your cabinets. Typical gaps range from 6 to 24 inches — even a 6-inch gap can hold a flat baking sheet or a row of cereal boxes on their sides. For taller gaps, use matching baskets or bins with labels facing forward — this makes the space look intentional and organized rather than like a dumping ground.
Put a small step stool nearby (or in a cabinet) so this space is actually accessible. If you have to precariously reach or drag a chair over every time, you won’t use it effectively.
Extra Tips
Matching woven baskets along the top of cabinets look intentionally decorative while providing real storage. This is a classic styling trick that makes the space look designed, not improvised.
What to Avoid
Don’t store heavy items above head height. A heavy cast iron pan kept above the cabinet is a falling hazard. Reserve this space for lightweight but bulky items only.
4.Use Under-Shelf Baskets
The Problem
Every shelf in a cabinet or on a shelving unit has unused space below it. If you’ve placed a 4-inch-tall container on a shelf that has 10 inches of clearance above it, there are 6 inches of empty air below the shelf above — which is wasted storage.
Why It Works
Under-shelf baskets hang from the bottom of a shelf and create an extra storage tier without adding any new furniture or making holes in the wall. They clip onto wire shelves instantly and sit flush with wood shelves using a clamp-style mount. Each basket can hold small items that would otherwise occupy valuable shelf space.
How to Do It
Under-shelf baskets work best for lightweight, flat items: produce bags, dish towels, small snack packages, foil and wrap boxes, lids, or packet items. Mount them under a shelf that has at least 5 inches of clearance above (for the basket) and enough room below the basket to still access items on the shelf below it.
They’re particularly effective on floating shelves and in linen-style open cabinets where the shelf is not too deep. Many clip on without any tools and can be repositioned easily.
Extra Tips
Use a clear under-shelf basket so you can identify contents without pulling it out. Wire baskets allow items to be seen from below, which is useful for flat items stored horizontally.
What to Avoid
Don’t overload under-shelf baskets — most have weight limits of 3–5 lbs. Don’t use them for heavy canned goods or glass jars.
Page 7 Quick Checklist
- Measure the gap above your upper cabinets
- Check all corner spaces — cabinet and open wall — for shelf potential
- Identify shelves with excess headroom for under-shelf baskets
- Assign only lightweight and infrequently used items to above-cabinet space
Up Next: Organize Under the Sink
Under the sink is usually a chaotic pile of cleaning supplies and random items. Next page: a simple three-step system to make it one of the most organized spots in your kitchen. ← PreviousNext: Under the Sink →
3.Organize Under the Sink
The under-sink cabinet is a challenging space: deep, awkward to see into, often interrupted by pipes, and prone to moisture. With the right setup, it can hold everything you need for cleaning and under-sink storage — neatly and safely.
2.Add a Two-Tier Under-Sink Organizer
The Problem
The under-sink cabinet has one big, open floor area that most people fill with a loose pile of cleaning spray bottles, dish soap, trash bags, and other items. The pipes running through the middle make it hard to use a standard shelf. Everything sits on the floor of the cabinet, things tip over, and the back half is unreachable.
Why It Works
Under-sink organizers are specifically designed around the pipe configuration. They typically have two tiers with cutouts or adjustable shelves that work around the pipes, creating a structured layout that doubles usable space. One tier holds tall spray bottles. Another holds small items in bins. The result is a cabinet that’s organized and fully accessible.
How to Do It
Measure your under-sink cabinet’s interior dimensions: width, depth, and the exact location of the drain pipe and any additional pipes. Look for an organizer labeled “under-sink” with an adjustable shelf or a cut-out that fits around standard drain configurations. Most are made of coated wire or plastic and are moisture-resistant.
Place taller items (spray bottles, dish soap) on the lower shelf or standing beside the organizer, and use the raised tier for small items in clear bins — sponges, extra soap pods, rubber gloves, and other small cleaning accessories.
Extra Tips
Add a liner or a waterproof tray to the floor of the cabinet to protect against any minor leaks. This makes cleanup much easier if a bottle drips or a small leak occurs.
What to Avoid
Don’t store food items under the sink, even in sealed containers. Moisture and cleaning chemical residue make this an inappropriate space for anything food-related.
1.Use Clear Bins for Cleaning Products
© 2025 AI Illustrator — Inspiration Only
The Problem
Cleaning products under the sink tend to be a disorganized mix of different bottle shapes, sizes, and categories — all piled together with no grouping or logic. When you need a specific product, you have to move everything to find it.
Why It Works
Clear bins work for the same reason they work in cabinets and on pantry shelves: they group related items, make everything visible at a glance, and can be pulled out as a unit for access to anything inside. Under the sink, they also prevent bottles from tipping against each other and creating leaks or spills.
How to Do It
Group your cleaning supplies into logical categories and assign each a bin. Common groupings: dish soap and sponges (one bin), counter and surface sprays (one bin), floor and bathroom crossover cleaners (one bin), extra stock and refills (one bin at the back). Label the front of each bin. Use bins that are easy to pull out — handles or cutout fronts help enormously.
Keep the bins you use most often at the front. Stock and refill bins can live at the back since they’re accessed less frequently.
Extra Tips
Do a product audit while you’re organizing this cabinet. Cleaning products accumulate in multiples — three different surface sprays, two unopened sponge packs, and a bottle of cleaner you’ve had for two years. Consolidate and clear out what you don’t actually use.
What to Avoid
Don’t mix different product categories in the same bin just because they fit together. If dish soap is in the same bin as floor cleaner, you’ll either avoid using the bin (because it’s confusing) or accidentally grab the wrong product while cooking.
Hang Small Items on the Cabinet Door
The Problem
Small but essential items — sponge holders, small spray bottles, a roll of trash bags, rubber gloves — take up disproportionate space on the cabinet floor or in bins because of their awkward shapes.
Why It Works
The inside of the under-sink door is usually a large, flat, completely unused surface. By mounting a door organizer here, you move several small items entirely off the cabinet floor — creating more room for the larger bottles and bins while keeping the small items instantly visible every time you open the cabinet.
How to Do It
A tension rod mounted between the two inner walls of the under-sink cabinet (not on the door) is a common solution for hanging spray bottles by their triggers — this is actually one of the most space-efficient setups possible. For the door itself, an over-the-door organizer with small pockets holds gloves, scrubbers, sponges, and small packets.
If you’re drilling into the door, small hooks and a wire organizer can hold a dish brush holder, a roll of trash bags, and other items that would otherwise sit loose on the cabinet floor.
Extra Tips
Measure clearance between the door organizer and the front of the bins or shelves inside before mounting. The door needs to close fully. Test the door swing with the organizer attached before committing to a permanent installation.
What to Avoid
Don’t put anything heavy on the door. Cabinet door hinges aren’t designed to carry significant weight. Keep the door organizer to small, lightweight items — a few hundred grams maximum per hook or pocket.
Page 8 Quick Checklist
- Measure interior of under-sink cabinet including pipe locations
- Add a waterproof liner to the cabinet floor
- Group cleaning products by category before buying bins
- Check door-to-interior clearance before mounting a door organizer
Up Next: Small Appliance Storage
Small appliances are some of the bulkiest, most inconvenient things to store in a small kitchen. On the next page, practical solutions that keep them accessible without taking over your counter. ← PreviousNext: Appliance Storage →
Make Small Appliances Easier to Store
Appliances are the trickiest storage challenge in a small kitchen — they’re bulky, oddly shaped, and needed unpredictably. These three ideas help you organize them in a way that keeps them off the counter but genuinely easy to access.
Create an Appliance Shelf
The Problem
Small appliances — toasters, air fryers, blenders, food processors — don’t have a natural home in most small kitchens. They’re too bulky for drawers, take up too much cabinet shelf height, and feel too inconvenient to put away if the storage system isn’t easy to use.
Why It Works
An appliance shelf is a dedicated zone — typically one deep lower cabinet shelf or a section of a pantry cart — that is sized specifically for appliances. Because it’s designated and easy to access, returning appliances after use actually happens. The counter stays clear. The appliances are organized in one predictable location.
How to Do It
Measure your most-used appliances: height, width, depth. Find the cabinet in your kitchen with the most headroom (lower cabinets near the floor often have more height clearance than upper ones) and clear it entirely for appliances. Stand each appliance upright in the cabinet, arranged so nothing blocks anything else. If needed, keep frequently used appliances at the front and weekly-use ones behind or beside them.
For appliances that are too tall for any cabinet, consider a dedicated appliance cabinet built from a freestanding shelving unit in a nearby closet or pantry nook if one exists.
Extra Tips
Keep each appliance’s cord wrapped and secured — a loose cord across a cabinet shelf quickly becomes tangled with other cords. Use a velcro cord tie or simply wrap the cord around the appliance base before storing.
What to Avoid
Don’t stack appliances directly on top of each other unless they’re designed to be stacked. Stacking causes scratches, and a heavy appliance on top of a lighter one can cause damage or make both harder to retrieve.
Use Vertical Dividers for Trays and Cutting Boards
The Problem
Cutting boards, baking sheets, cooling racks, pizza stones, and large serving trays are flat, unwieldy, and almost impossible to stack efficiently. They topple if leaned, scratch each other if stacked, and take up disproportionate shelf space when stored flat.
Why It Works
Vertical dividers store flat items on their edge — like files in a filing cabinet — rather than stacked horizontally. Each item stands upright in its own slot. You can pull out exactly the cutting board you need without moving the others, and the same footprint of shelf space that previously held two or three flat items stacked now holds eight or ten standing upright.
How to Do It
Cabinet vertical dividers are available as standalone inserts or as adjustable units that span the width of a cabinet shelf. They typically have 4–8 slots. Measure your cabinet interior — especially the clearance height — before buying to make sure your largest baking sheet fits standing upright in the divider slots.
Group items logically in the divider: cutting boards together, baking sheets together, cooling racks together. This way you pull out the right item the first time.
Extra Tips
A tension-rod system — two or three rods spanning the cabinet width — is a very cheap DIY version of vertical divider storage and works surprisingly well for baking sheets and cutting boards. Install the rods parallel and spaced to hold your items upright.
What to Avoid
Don’t mix cutting boards and baking sheets in the same section of a divider without separating them — the height difference makes everything fall sideways. Group items by similar heights.
Store Appliance Accessories in Labeled Bins
The Problem
Most small appliances come with accessories — blender lids and blades, food processor attachments, air fryer inserts, stand mixer bowls and beaters. These accessories are smaller than the appliance itself and tend to get scattered across drawers, stashed on random shelves, or lost entirely.
Why It Works
Keeping each appliance’s accessories in a labeled bin beside or near the appliance means the entire setup — appliance plus all attachments — lives in one place. When you pull out the blender, you reach for the labeled bin, and everything you need is there. No hunting. No mystery drawers. This is a particularly important idea for small kitchen storage solutions because it prevents accessories from colonizing drawer space.
How to Do It
Assign one small clear bin per appliance. Label it clearly — “Blender Accessories,” “Air Fryer Inserts,” “Mixer Attachments.” Store each bin next to or on the shelf immediately above or below its corresponding appliance. When you put the appliance away, put the accessories away in the bin at the same time. Make this a simultaneous action rather than two separate steps.
Extra Tips
For large appliances with many attachments (like a food processor with multiple blade types), use a slightly larger bin and add small dividers or ziplock bags to keep attachments separated and protected from scratching each other.
What to Avoid
Don’t use the same bin for accessories from two different appliances. When the bin gets overfull, you stop finding things quickly — and the system breaks down. One appliance, one bin.
Page 9 Quick Checklist
- Measure all your appliances before assigning a cabinet
- Clear one lower cabinet entirely as a dedicated appliance zone
- Install vertical dividers or tension rods for flat items
- Label one small bin per appliance for accessories
Up Next: Build a No-Pantry System That Lasts
The final page is about the most important piece: creating habits that keep your kitchen organized week after week, without constant effort. Plus a full checklist of all 30 hacks. ← PreviousNext: Keep the System Going →
Build a No-Pantry System That Stays Organized
All the physical organization in the world doesn’t help much if it falls apart within a month. These final three ideas are about building simple routines that keep your kitchen working well over the long term — without requiring major effort every week.
Build a Weekly Kitchen Reset Routine
The Problem
Even a well-organized kitchen drifts gradually over the course of a week. Items get left in the wrong spot, the counter tray fills up, and bins start mixing categories. Without a reset, this drift compounds week over week until the kitchen is back to its original cluttered state.
Why It Works
A weekly reset catches drift before it becomes disorder. Because it’s recurring and expected, it doesn’t feel like a big cleaning event — it’s just a brief maintenance habit, like watering a plant. Most well-organized kitchens need only 10–15 minutes of weekly reset to stay in good shape indefinitely.
How to Do It
Pick a specific time each week — Sunday evening after grocery shopping works well because you’re already interacting with the food. Build the reset around a simple checklist: return misplaced items to their zones, wipe down the counter tray, check bins for mixing and resort if needed, look over the mini pantry shelf for anything that’s running low or expiring soon, and wipe down any visible organizers.
Set a timer for 15 minutes. The time limit keeps the reset from expanding into a full clean-out. If you find yourself wanting to do more, add a separate “deep organization” session once a month rather than expanding the weekly reset.
Extra Tips
The weekly reset is also a good time to check the “use first” basket (see idea 29 below) and update your grocery list based on what’s running low. These three tasks — reset, check use-first, update shopping list — form a 15-minute kitchen management routine that keeps everything running smoothly.
What to Avoid
Don’t skip the weekly reset for more than one week. Two skipped weeks means two weeks of drift, and by week three the kitchen feels disorganized enough that the reset itself feels daunting. The routine only works if it’s actually weekly.
Keep a “Use First” Basket
The Problem
Without a pantry, it’s easy to lose track of items that are close to expiring or that have been partially used — the last bit of pasta, the open jar of sauce, the produce that needs to be cooked before it goes bad. These items tend to get pushed to the back and forgotten, leading to food waste and unnecessary spending.
Why It Works
A dedicated “use first” basket or bin — placed in your most visible, most accessible spot — acts as a constant visual reminder of what needs to be consumed before buying more of anything. It’s a first-in-first-out system adapted for a home kitchen, and it significantly reduces food waste even in small kitchens with limited storage.
How to Do It
Designate a small basket or clear container in a very visible location — the front of your mini pantry shelf, a spot on the counter, or the front of your rolling cart. Any item that needs to be used soon goes into this basket: the last serving of rice, the opened can that’s been sitting in the fridge for a few days, the produce that won’t last another week, the box of crackers that’s almost empty.
Make it a rule: before opening anything new, check the use-first basket first. When you grocery shop, scan the basket before writing your list.
Extra Tips
Label the basket so everyone in the household knows what it’s for. If your partner or kids see an item in there, they should know it means “eat or cook this soon.” This turns a personal system into a shared household system.
What to Avoid
Don’t let the use-first basket become a permanent graveyard for items you’re avoiding. If something stays in the basket for more than a week without being used, either cook it that weekend or admit it’s not going to get used and remove it from your inventory entirely.
Declutter Before Buying More Organizers
The Problem
This is where we end the list — and it might be the most important idea of all. When a kitchen feels disorganized, the instinctive response is to buy more organizers. Another bin. Another shelf. Another cart. And sometimes that’s the right move. But very often, the root cause is too many things — not too few containers. Buying more storage for too many items just shifts the clutter into boxes.
Why It Works
Decluttering before organizing ensures that every organizer you buy earns its place. The result is a kitchen that has less in it, organized more purposefully — which looks cleaner, feels less stressful, and is far easier to maintain than a kitchen full of beautifully labeled containers crammed with things you don’t need. For more guidance on this approach, see small apartment kitchen storage ideas that prioritize reduction as much as organization.
How to Do It
At the start of every new quarter — or whenever you feel the kitchen is getting out of control — do a 20-minute declutter before you do anything else. Open every cabinet, every drawer, every bin. Remove anything that’s expired, broken, duplicated, or not genuinely used. Only after the declutter should you assess what organizers might actually help. You’ll often find the problem has largely solved itself.
Extra Tips
A useful question to ask about any kitchen item you’re on the fence about: “Would I buy this again today, knowing exactly how much I use it?” If the answer is no, let it go. It served its purpose; it doesn’t need to take up space indefinitely.
What to Avoid
Don’t declutter and then immediately go on an organizing shopping trip. Wait at least a few days after the declutter — use the kitchen with its reduced inventory first. You’ll have a much clearer picture of what you actually need after using the space for a bit.
✓ Complete Checklist: All 30 Small Kitchen Hacks Without a Pantry
- Create a daily-use kitchen zone
- Remove duplicates before buying storage
- Turn one shelf into a mini pantry
- Add floating shelves above empty wall space
- Use wall rails with hooks
- Use the side of the fridge for magnetic storage
- Add shelf risers inside cabinets
- Use pull-out cabinet baskets
- Use cabinet door organizers
- Decant dry foods into clear containers
- Label everything clearly
- Create food zones (breakfast, snacks, dinner, baking)
- Use a slim rolling cart as a pantry alternative
- Use stackable bins on the cart
- Park the cart in dead space
- Keep only 3–5 items on the counter
- Use a tray for oils and seasonings
- Move rarely used appliances away from the counter
- Use corner shelves carefully
- Use the space above cabinets
- Use under-shelf baskets
- Add a two-tier under-sink organizer
- Use clear bins for cleaning products
- Hang small items on the cabinet door
- Create a dedicated appliance shelf
- Use vertical dividers for trays and cutting boards
- Store appliance accessories in labeled bins
- Build a weekly kitchen reset routine
- Keep a “use first” basket
- Declutter before buying more organizers
Start With One Small Fix Today
If your kitchen feels like an overwhelming project, take a breath and resist the urge to tackle everything at once. Living with a small kitchen and no pantry is a real challenge — but it’s one that has practical, affordable solutions.
The key insight from all 30 of these ideas is the same: organize small kitchen spaces by working with what you have, not by adding more stuff. A daily-use zone, a mini pantry shelf, a rolling cart in the right gap, and a 15-minute weekly reset will do more for your kitchen than an expensive storage renovation.
Pick one idea from this list — just one — and do it today. Move one duplicated item out. Clear one shelf. Label one bin. The momentum that comes from one small, visible improvement is what starts the whole system moving.
Your kitchen doesn’t need to be perfect. It needs to be functional for how you actually live. Start there.
One Comment
Comments are closed.